-
 Stefanie
- Leestijd: 5 min
- Laatst geüpdatet: 22/01/2024
How to solve a rubik’s cube?
Solving a speed cube is a great challenge for the beginner. It remains a fascinating puzzle that is challenging for young and old alike. To find out how to solve this magic puzzle cube, read all about it here. This way you can brag to your family and friends on vacation about how quickly you can solve it!
Simple principle: work layer by layer
Despite the fact that solving a Rubik’s cube can be very complex if you don’t understand how the internal mechanism works, the workable strategy behind it to figure out the solution is quite simple. Anyone can learn how to solve a Rubik’s cube, so can you! A quick method you can use to solve a Rubik’s cube is called the Layer-by-Layer method. A standard 3×3 cube has nine cubes per face for sorting. You can divide these cubes into three layers: the top layer, middle layer and the bottom layer. The strategy to solve a speed cube in the Layer-by-Layer method works as follows: first you solve the bottom layer, then the middle layer, and finally the top layer. So how to solve a Rubik’s cube is mainly a matter of being systematic and memorizing all the algorithms. Once you master these steps, you can solve the cube faster and faster.
 Solve Rubik’s cube by making a cross
A first stage of solving a speed cube is to make a cross. You pick a color of your choice and look for the cube where that color is in the middle. This is an anchor point since these middle blocks always stay in the center no matter how you turn them. Then look for border blocks of the same color. Edge cubes of the Rubik’s cube are the cubes that are only on the edge and not on a corner. Then sort the border cubes of the same color you had chosen and combine them with the center cube of the same color. You have now created a cross on the first layer, the top layer. As a final step, make sure that the colors of the center blocks of the second layer, that is, the middle layer, match the border blocks of the cross you created.
Completing the first plane of the speedcube
Next, complete the first plane of the Rubik’s cube by finding the corner cubes of the chosen color and completing the cross with them. This involves first finding and moving the corner cubes from the third layer, the bottom layer. Then do the same with the corner cubes from the second layer. Thus, you have completed the first plane and can solve this part of the Rubik’s cube!
Resolving the middle layer
How to solve the next step is by first turning the speedcube over now. The bottom layer is now the top layer. From there, bring the border blocks that belong on the middle layer from the new top layer to the center. In some cases now, the edge blocks may be in the right place, but the colors are reversed relative to the center blocks. Or they may be on the middle layer, but simply in the wrong place. How to solve that is as follows. In that case, you can bring one edge block to the top layer, rotate it to the right position, then bring it to the right place with the right rotation. Do this for all four edge blocks. You can now solve the second layer from the Rubik’s cube as well.
Solving the final steps of the Rubik’s cube
Basically, it comes down to creating another cross in the last, top, layer. Here it is not important that the edge blocks of the cross exactly match the center blocks of the middle layer only that you have a new cross. If that is not already the case one of the following three situations apply, each of which has its own solution to the Rubik’s cube.
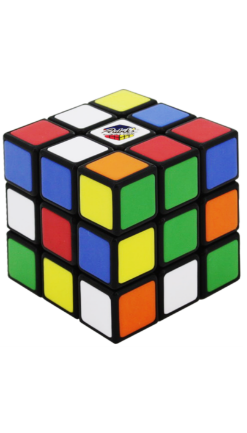
First end situation resolution
Two of the edge blocks that should form the cross are on a different plane, but are located on planes next to each other. Thus, the three cubes of the last color make an L-shape on the top surface of the speedcube. If you are now looking straight at the side with a wrongly turned edge block, that is now the front.
1) Turn the front one quarter clockwise.
2) Then turn the top (where the cross should be) a quarter clockwise.
3) Turn the right side, where your edge block now sits, a quarter clockwise.
4) Turn the top counterclockwise a quarter turn.
5) Do the same with the right side.
6) And finally, also with the front.
This is how you can solve this situation from the Rubik’s cube.
Second end situation resolution
Also in this case, two of the edge cubes are located on wrong faces, but in this situation those faces are across from each other from the Rubik’s cube. The three cubes of the last color on the first plane thereby make a straight line, an I-shape. Again, look straight at this against a misplaced edge block.
1) Turn the front end clockwise a quarter turn.
2) Same for the right side.
3) Also for the top.
4) Then go a quarter counterclockwise with the right side.
5) Do the same with the top.
6) And eventually at the front as well.
Solving third end situation
In the latter situation, all four edge cubes of the remaining color are on a different plane. So all four of the surrounding planes each carry one of those wrongly turned edge blocks. Choose one of the four wrong blocks on the border. Then turn as follows:
1) Front.
2) Top.
3) Right side.
4) Top counterclockwise.
5) Same for right side.
6) And also for front.
7) Then clockwise again for the top.
8) Front.
9) Right side.
10) Top.
11) And finally counterclockwise again at right side.
12) And top.
13) And the front.
Cross connect to the middle layer
Now that the cross can be seen on the top layer it does not mean that the border blocks of with the colors on the other surfaces match the middle layer. In this step, you will learn how to solve that with the Rubik’s cube. The key here is to interchange the edge blocks of the cross just as long as all the colors match properly.
Setting final corner blocks properly
The task now is to put all the corner cubes of the Rubik’s cube in the right place. The trick behind that is by turning the corner cubes in the right place first even though the colors are turned the wrong way. When all these cubes are in the correct positions, only the last step remains, and that is to match the colors to the surfaces. This is how to systematically solve a Rubik’s cube.
So that’s how to quickly solve a Rubik’s cube!
If you follow these steps, you will see that solving a Rubik’s cube is not that difficult at all! As everyone knows; practice makes perfect. So keep practicing long enough. You will find yourself getting faster and better at solving a Rubik’s cube. Eventually, it is also useful to purchase a cube timer. That way you can see how fast you are and also see that you are making progress. Are you already good at solving a Rubik’s cube? Then check out our range for the more difficult cubes. In fact, we have many different cubes in various levels of difficulty. Not so good at solving a speed cube yet? So for this, too, we have several cubes. So check out our webshop speedcubes quickly and find the cube that suits you!
Also read more about how to make a speed cube smooth and what the best Rubik’s cube is!
Photo credit: Unsplash
Table of contents
Much viewed
More blogs

